Leveraging Jenkins with Private GitHub and EC2 for Seamless Development Workflow
As developers, we often have to go through many steps to build, test and deploy our project. But what if we could automate these tasks and streamline the process? GitHub already offers some automation features, but they were not enough for me. Last year i was working on a SAAS platform for a client that used Laravel for the API, Vue for the front-end and Node.js for some parts to have CURL. It was very time-consuming to deploy all these components manually, so I decided to use CI/CD to automate the process.
Today, I will explain how to do it with AWS EC2 which has Jenkins installed and runs Laravel under apache.
This is a scalable architecture that can handle high traffic, but I will leave that for another time. Let’s focus on the CI/CD pipeline first to automate your coding and building process.
Lets start,
Jenkins is a popular open-source tool for continuous integration and delivery. It allows you to automate the building, testing, and deployment of your software projects. In this article, I will show you how to configure a private GitHub repo with Jenkins using the username and SSH keys.
Installation of Jenkins
Before we start, you need to have Jenkins installed and configured on your server. I am using an EC2 instance on AWS, but the installation process may vary depending on your platform. You also need to install all the default plugins that are available at the time of installation.
To install Jenkins on an EC2 instance, you can follow these steps:
- Connect to your EC2 instance using SSH or just open a terminal.
- Run the following commands to update your system and install Java:
sudo yum update -y
sudo yum install java-1.8.0-openjdk -yy
3. Download the latest Jenkins package from the official website:
wget -0 /tmp/jenkins.war http://mirrors.jenkins-ci.org/war/latest/jenkins.war 4. [Optional] for old versions
sudo systemctl daemon-reload
sudo systemctl enable jenkins.service
sudo systemctl start jenkins.service
5. Open your browser and go to http://:127.0.0.18080to see the Jenkins web interface. You will need to enter the initial admin password that is stored by Jenkins. You can use the following command to view it: [location can be different based on the machine type]
That's all for now, let's connect Github with Jenkins so that they can communicate and can share data.
Connecting Github and Jenkins
Now that we have Jenkins up and running, we need to connect it with our private GitHub repo. To do this, we will use SSH keys to authenticate and authorize our communication.
- Generating SSH keys: We need to generate a pair of SSH keys: one public and one private. The public key will be added to our GitHub repo as a deploy key, and the private key will be added to our Jenkins credentials as an SSH username and private key.
- To generate SSH keys, follow these steps:
- Connect to your EC2 instance using SSH or just open a terminal and run the following commands [may vary based on your machine].
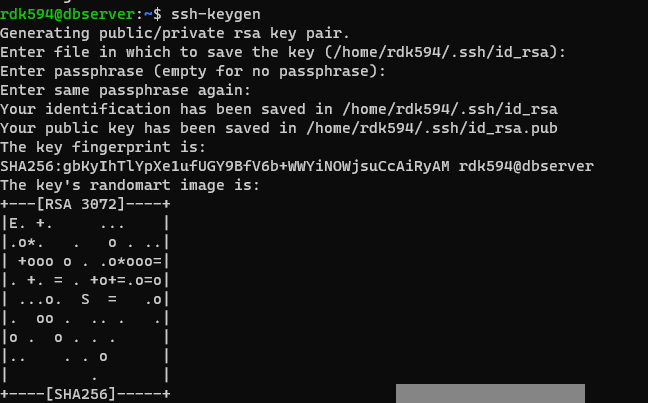
ssh-keygen -t rsa -b 4096 -C “your rajneesh@grapdevs.com“
When prompted, enter a file name for your key pair
(e.g., /home/ec2-user/. ssh/) and a passphrase (optional).
You will see something like this:

Adding the public key to GitHub:
We need to add our public key to our GitHub repo as a deploy key so that we can create a communication link in between GitHub and Jenkins. A deploy key is an SSH key that grants read-only or read-write access to a single repository. This way, we can ensure that only Jenkins can access our particular repo and no one else [Do not add to your main profiles settings for best practices].
To add our public key to GitHub, follow these steps:
- Go to your private GitHub repo and click on the Settings tab.
- Under Settings, find Deploy keys and click on Add deploy key.
- Enter a title for your key (e.g., Jenkins) and copy and paste the contents of your public key file (/home/ec2-user/.ssh /jenkins.pub) into the Key field.
cat /home/ec2-user/.ssh/id_rsa.pubIf you don’t want Jenkins to make any changes to your repo, uncheck the Allow write access option. This will grant read-only access to your repo. Click on the Add key and confirm your action. Click on the Add key and confirm your action.
so now let's move to next big and important step adding private key to Jenkins
We need to add our private key to Jenkins as an SSH username and private key credential. This will allow Jenkins to use our SSH key to authenticate with GitHub and clone our repo.
To add our private key to Jenkins, follow these steps:
- Go to your Jenkins web interface and click on Manage Jenkins.
- Under Manage Jenkins, find Credentials and click on Manage Credentials.
- Under Global credentials (unrestricted), click on Add Credentials.
- Select SSH Username with the private key as the Kind and Global as the Scope.
- Enter your GitHub username as the Username.
- Select Enter directly as the Private Key option and copy and paste the contents of your private key file into the Key field using the following command.
cat /home/ec2-user/.ssh/id_rsa- Optionally, enter a passphrase if you set one when generating your SSH keys.
- Enter a meaningful ID (e.g., GitHub-ssh) and Description (e.g., SSH key for GitHub) for your credential.
- Click on OK to save your credentials.
You have successfully added your private key to Jenkins as an SSH username and private key credential.
😅 😅I understand that these configurations can be tedious, but let me share a song with you. You can follow the steps while listening to the song'KALEO - Way Down We Go'
Last Step 😅
Adding your Private repo to Jenkins
Now that we have configured Jenkins and GitHub to communicate with each other using SSH keys, we can add our repo to Jenkins as a project and start building it.
- Go to your Jenkins web interface and click on New Item.
- Enter a name for your project (e.g., laravel-jenkins) and select Freestyle project as the type. Click onOK.
- Under Source Code Management, select Git and enter your repo's SSH URL URL in the Repository URL field.
- Select your credential (e.g., github-ssh) from the Credentials dropdown menu.
- Enter your branch name (e.g., master) in the Branches to build field and click on Apply.
You have successfully added your repo to Jenkins as a project.
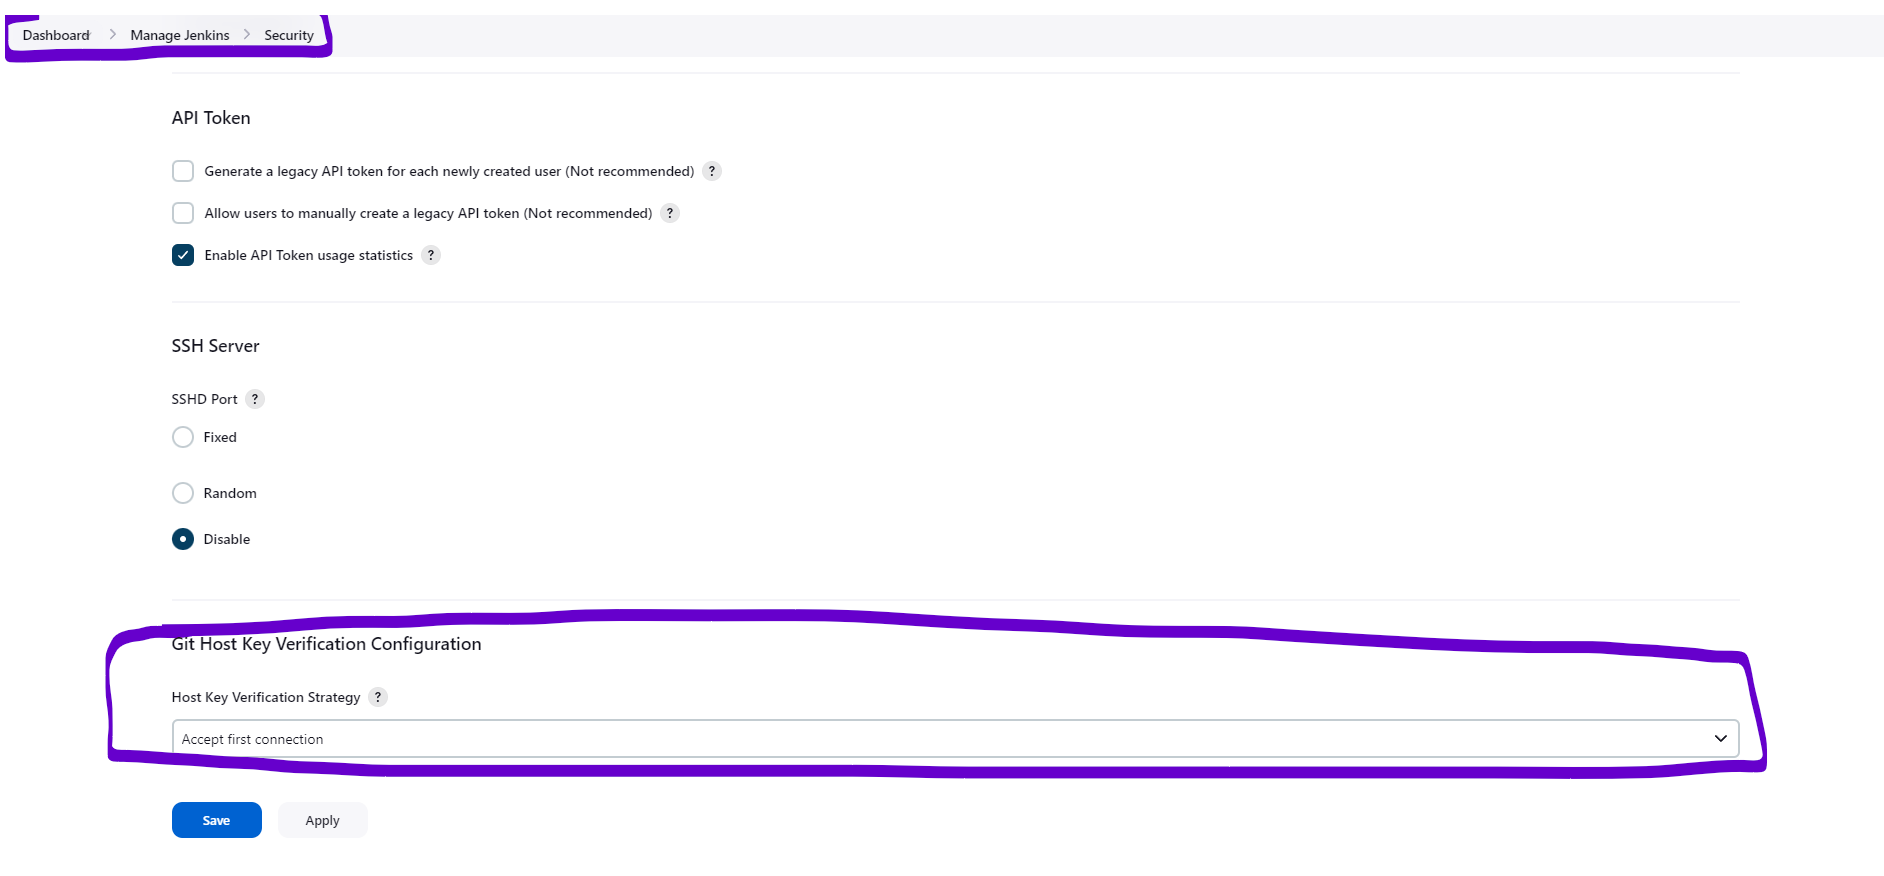
If you still get an error like “no access to GitHub” or something similar to it after adding all the keys and configurations, you can try this solution: Open Jenkins, click on Manage Jenkins and then Security. Scroll down and find “Host Key Verification Strategy”. From the dropdown menu, select “Accept first connection”. Save and apply the changes. See the following image for reference:

Testing your configuration
To test if everything is working properly, you can trigger a build manually or automatically. To trigger a build manually, follow these steps:
- Go to your Jenkins web interface and click on your project name (e.g., laravel-jenkins).
- Click on Build Now and wait for the build to finish.
- Click on Console Output and check if there are any errors or warnings.
To trigger a build automatically, you can use GitHub webhooks. A webhook is a way for GitHub to notify Jenkins when something happens in your repo, such as a push, or a pull request.
You can use GitHub webhooks to trigger a build automatically. A webhook is a method for GitHub to inform Jenkins when an event occurs in your repo, such as a push or a pull request. I will explain how to set up webhooks in a future article or post. It’s quite easy if you do some research, but if you need help, let me know.
This is only a glimpse(30%) of what Jenkins can do. There are thousands of plugins that you can use to automate, notify developers, test, manage and approve your code. I will surely cover them in more detail later.